TAPS: Citations and References in Word
INTRODUCTION
Your citations and references must be defined correctly and linked together in Word before sending the Word document to TAPS.
The vast majority of ACM articles use numbered citations and references - the sponsoring events and SIGs have chosen to use this style.
If you are preparing an article for an event sponsored by SIGGRAPH or SIGPLAN, you will need to use the "author year" citation and reference style. This style has more steps in the process.
THE BASICS
Because you're using Microsoft Word to prepare your article for ACM publication, you will need to start with their "submission" template, available from this link. This Word document contains all of the styles you'll use to tag your content as you prepare it for publication, as well as instructions and examples of many of the commonly-used elements of an article.
As you build your article, you should note where you will be placing citations. If you are using numbered citations and references, the reference number - "...as shown in [7]..." is sufficient. If you are using the "author year" style, a reasonable placeholder is the primary author's last name and the year of publication - "...as shown in [Davis 1960]..." - we will be updating this placeholder later in the process with the citation label as generated by the Word macros in the "master template."
Your references should follow the ACM Reference Format. Please use full names for authors - "Kenny Barron" and not "K. Barron" - as this allows for easier citation linking and counting, and more clearly identifies your citations' authors for others.
WHEN YOUR WORK IS ACCEPTED
If and when your content is accepted for presentation at an ACM-sponsored event, you will need to perform additional tasks - tagging additional elements, adding CCS concepts, cross-linking figures, tables, citations, and references - before delivering your Word document to TAPS.
TAPS will convert your single-column Word document to HTML5 and to a two-column PDF for your review and approval.
The remainder of this document explains the steps necessary to set up the citations and references in your Word document, covering both the "numbered" and "author year" citation and reference styles. You should follow the instructions for the style chosen by the event's sponsoring SIG and the instructions provided to you by the event's organizers.
ATTACHING THE MASTER TEMPLATE
The first step in this process is to attach the "master" template to your Word document.
This file contains additional styles and macros that will be used to prepare and to
validate your article. It is available from
If you are using Microsoft Word for the Macintosh, follow these instructions:
- From the "Tools" menu, select the "Templates and Add-Ins" menu item.
- Select the "Attach..." button, and find "acm_mat_word_v1.dotm" file: this is the "master template" file.
- Select the "OK" button.
- A dialog box will appear warning you about macros. This is expected; the "master template" file contains macros. Please select "Enable Macros."
- Your Word document now has several additional menus: "Head Elements," "Body Elements," "Reference and Cross Linking," and "ACM Templates."
If you are using Microsoft Word for Windows, follow these instructions:
- From the "File" menu, select the "Options" menu item.
- The "Word Options" dialog box has options along the left: select "Add-ins," and then from the "Manage:" selection menu, select "Templates" and press the "Go..." button.
- Select the "Attach..." button, find "acm_mat_word_v1.dotm" and select "OK" to load it.
- You'll see a SECURITY WARNING about macros. This is expected; the "master template" file contains macros. Please select "Enable Content" to load the macros.
- Your Word document now has several additional menus: "Head Elements," "Body Elements," "Reference and Cross Linking," and "ACM Templates."
PREPARING YOUR CITATIONS AND REFERENCES
As part of the final preparation of your Word document for submission to TAPS, you will need to "cross-link" your citations and references; this action defines a link between each reference and each of its citations in your article.
The instructions are different for the "numbered" and "author year" citation and reference styles; the following subsections contain the style-specific information you must use.
NUMBERED CITATION AND REFERENCE STYLE
From the "Reference and Cross Linking" menu, select the "Cross-referencing --> Float and Bibliography" menu item. The "Float and Bibliography" macro will start to run, and will ask to acknowledge that the "</BIBL>" tag it has added to your document is in the right place (at the conclusion of the references).
You will then be asked to choose a citation type, either "1" for numbered citations or "2" for author year citations. Choose "1."
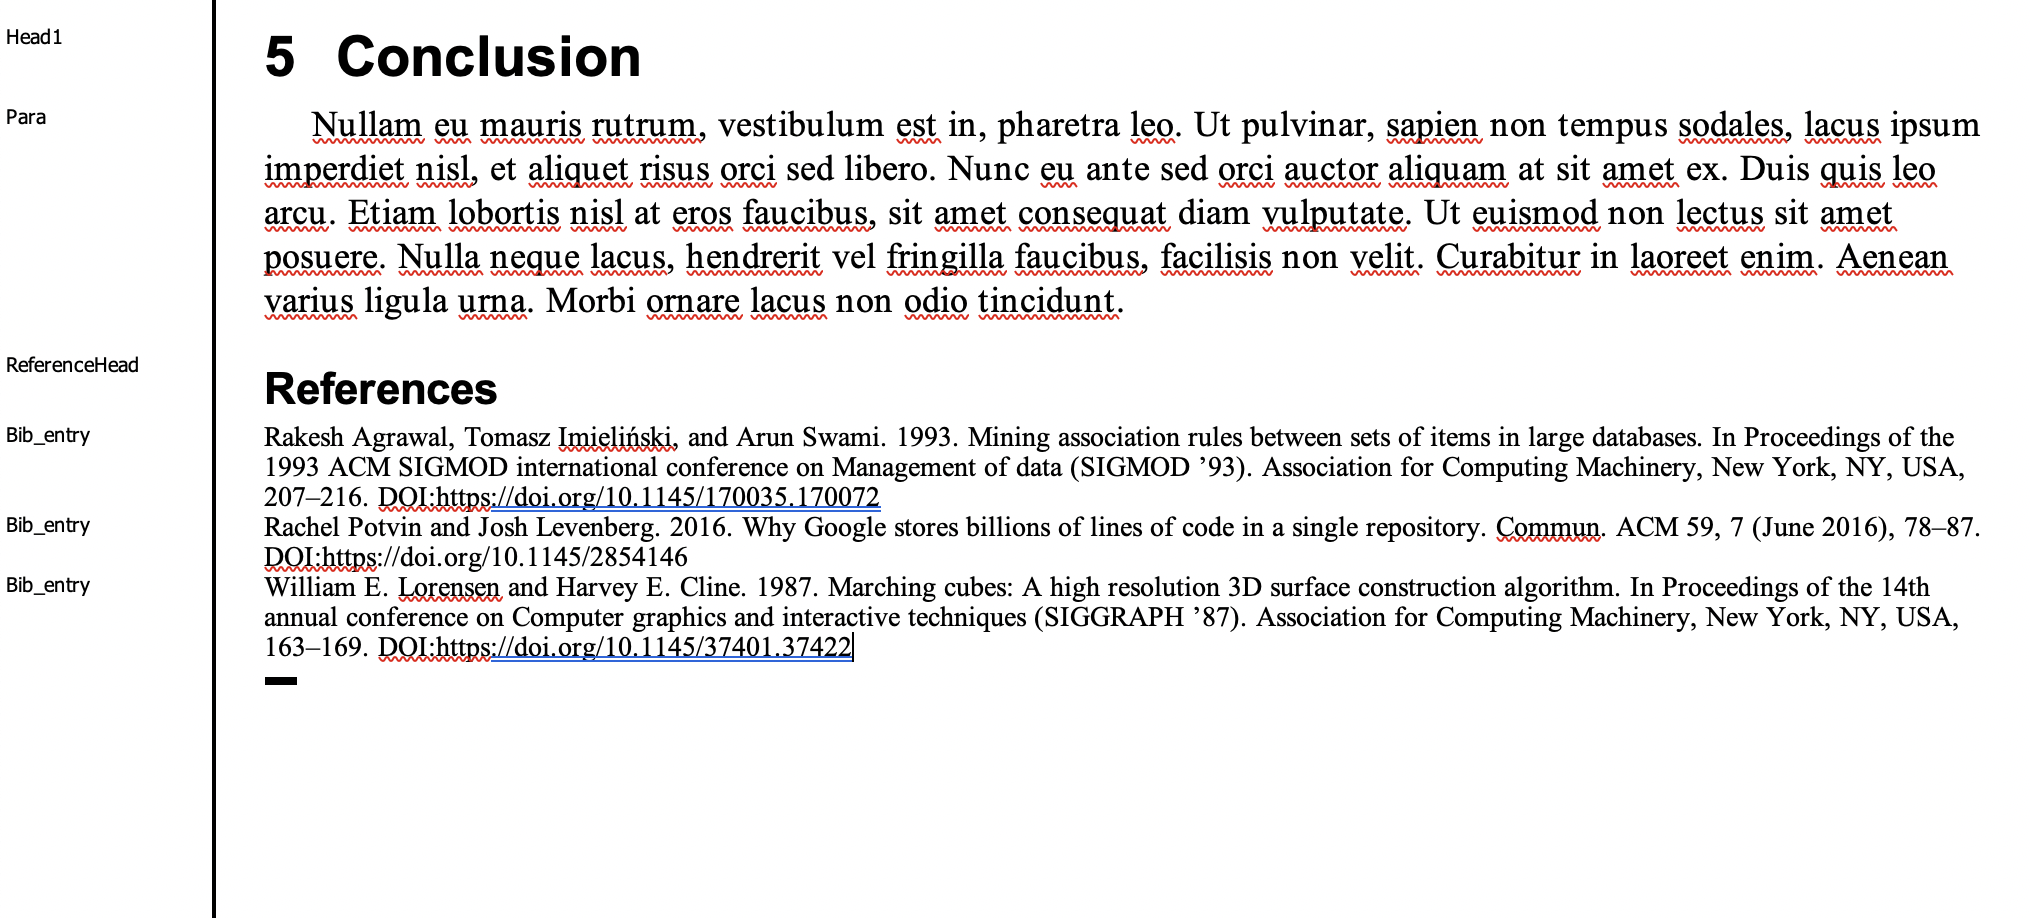
After a little more processing of your document by the "Float and Bibliography" macro, you should see a message that says that processing was successful. The citations in your document are now links (and are colored blue), and should have "hover text."
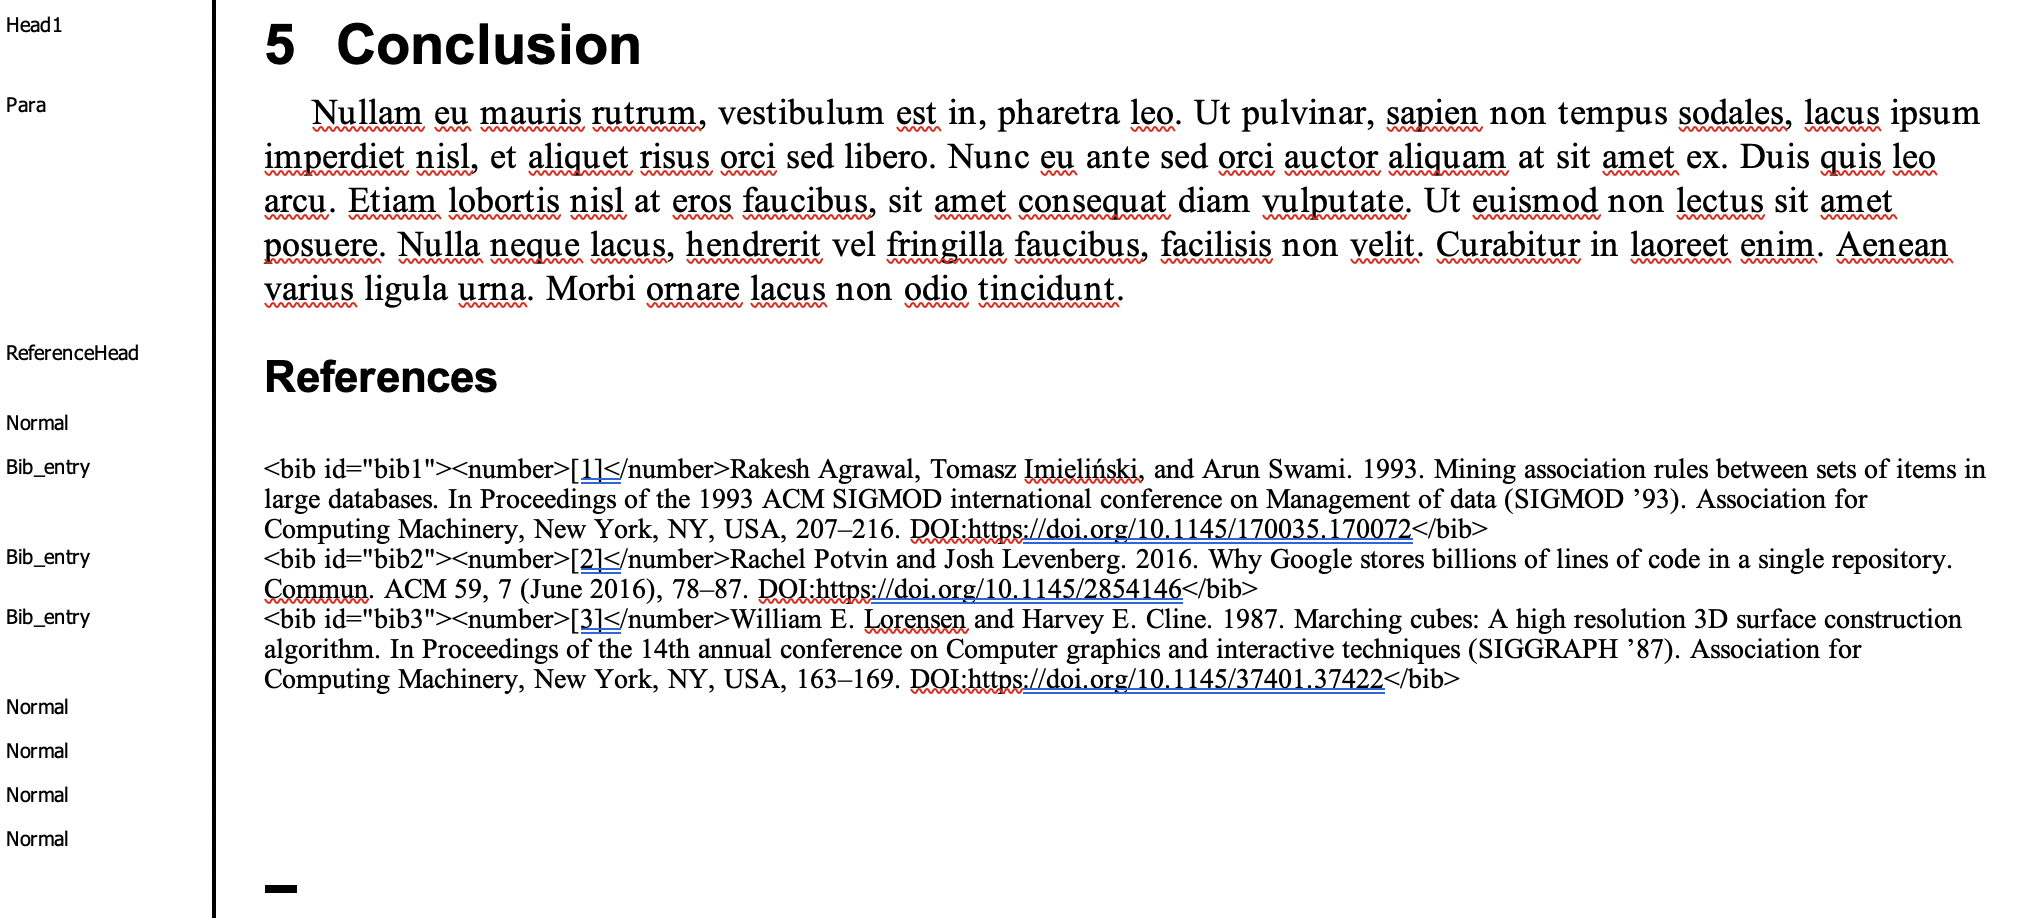
Your references will look a little different after processing; the macro has added some text to each one. This is intentional, and expected behavior.
After successfully linking your citations and references, you must select "Manuscript Validation" from the "ACM Templates" menu and run a separate macro that checks the Word document for issues.
AUTHOR YEAR CITATION AND REFERENCE STYLE
This citation and reference style requires more work on your part than for an article using the "numbered" citation and reference style; the authors and the year of each reference must be tagged before the cross-linking of citations and references, and you will need to update the placeholder citations with the citation labels generated by the "Float and Bibliography" macro.
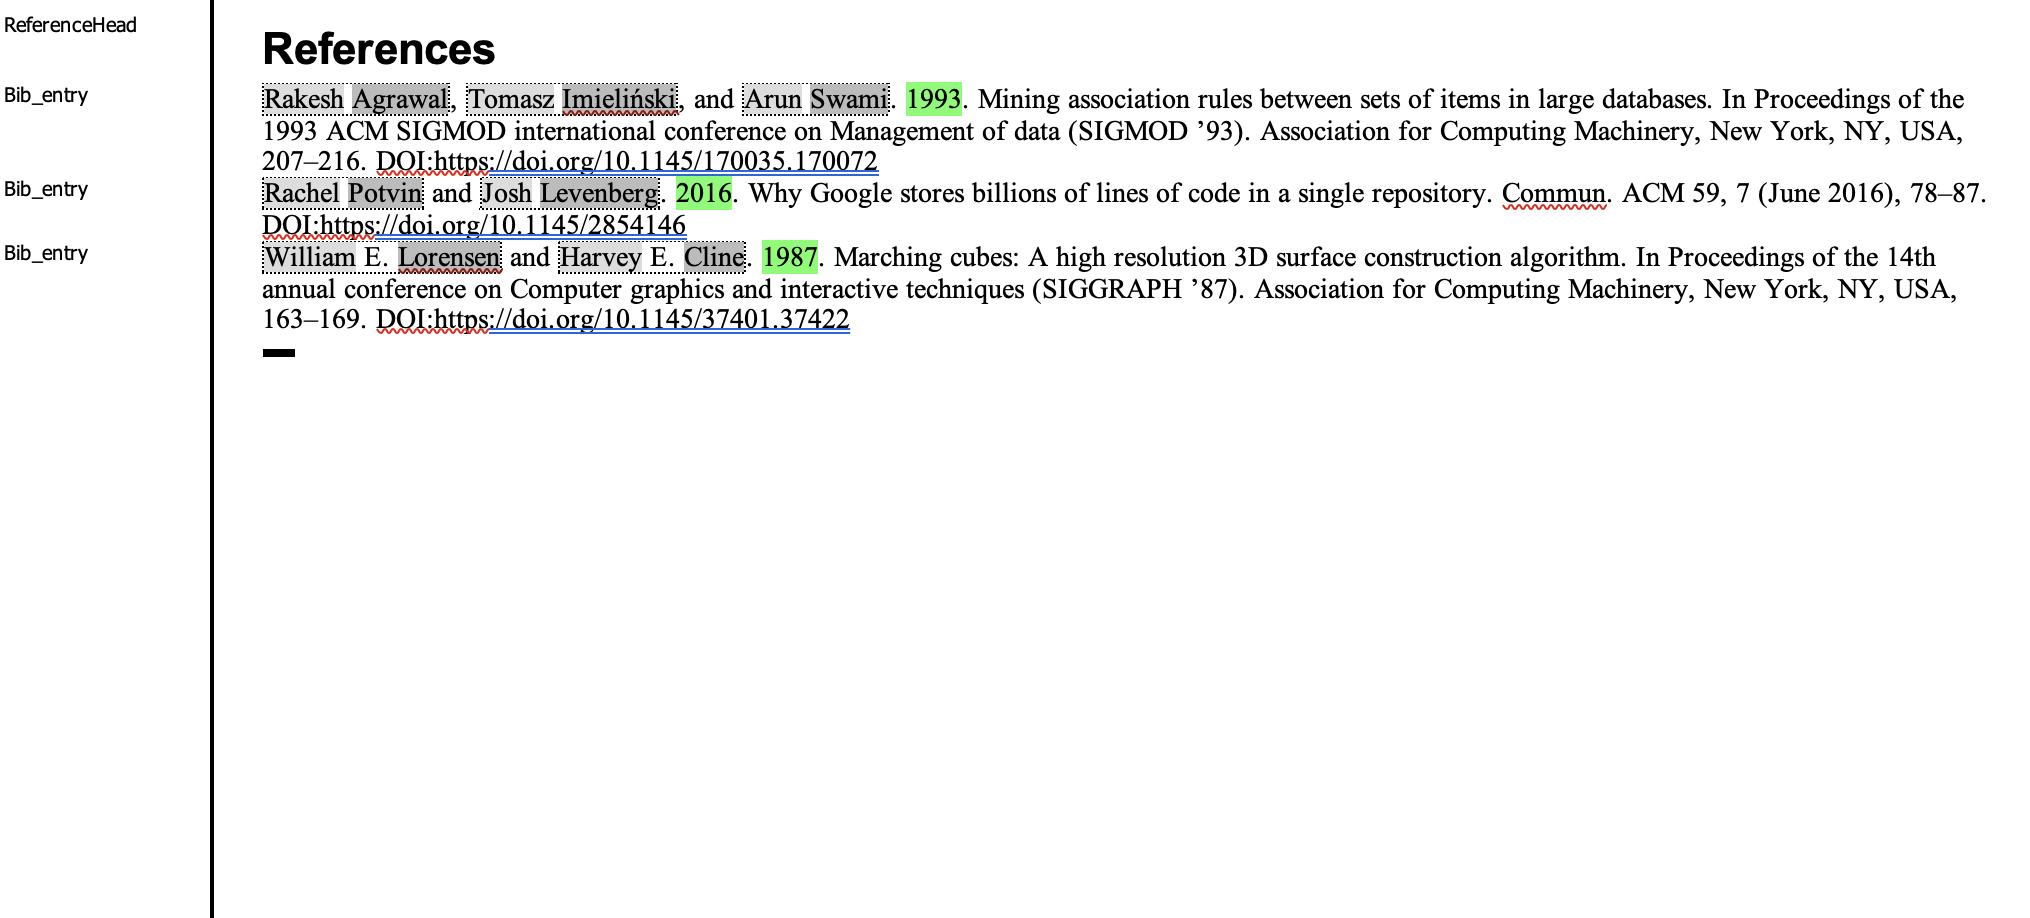
For each reference in your article, you will need to apply a tag to the year of publication, and apply tags to the names of each of the authors.
From the "Reference and Cross Linking" menu, please note the five buttons on the left side of the menu: "Auth Group," "Surname," "FirstName," "Collab," and "Year." You will use these buttons to apply these tags (or styles) to selected parts of each reference.
For each author of each reference, you will need to perform the following tasks:
- Select the first name of the author and select the "FirstName" button.
- Select the last name (or surname) of the author and select the "Surname" button.
- Select the first and last names as a single selection and select the "Auth Group" button.
NOTE: If your reference is a company - "NVIDIA" or "SenseGlove" - that has only one name, do steps 2 and 3 above, first selecting the company name and selecting the "Surname" button, then selecting the name again again and selecting the "Auth Group" button.
NOTE: When selecting the first name and the last name (surname) of an author, make very sure you are not selecting the space immediately following the last letter of the name you are selecting. Doing so will result in a validation error that will need to be corrected.
NOTE: Removing the style or tag from a text selection can be done by making the selection and pressing the <Ctrl> key and the spacebar simultaneously.
If you are formatting a reference that has no explicit author - program documentation, for example, and all that you have is the name of the company ("NVIDIA" for example) and the year of publication or access of the documentation, select the company name and select the "Surname" button, then select the company name again and select the "Auth Group" button. The citation will look like this: [NVIDIA, 2021].
Any middle initial(s) can be selected as part of the "Auth Group" operation. The first name and surname will be shaded in different gray levels, and when the "Auth Group" tag is applied, a dashed box will enclose that selection. The year will be enclosed in a bright green box when the "Year" tag is applied.
Attaching the "master" template to your Word document added several items to the Word menu bar, including "Reference and Cross Linking."
From the "Reference and Cross Linking" menu, select the "Cross-referencing --> Float and Bibliography" menu item. The "Float and Bibliography" macro will start to run, and will ask to acknowledge that the "</BIBL>" tag it has added to your document is in the right place (at the conclusion of the references).
You will then be asked to choose a citation type, either "1" for numbered citations or "2" for author year citations. Choose "2."
Your references will look a little different after processing; the macro has added some text to each one. This is intentional, and expected behavior.
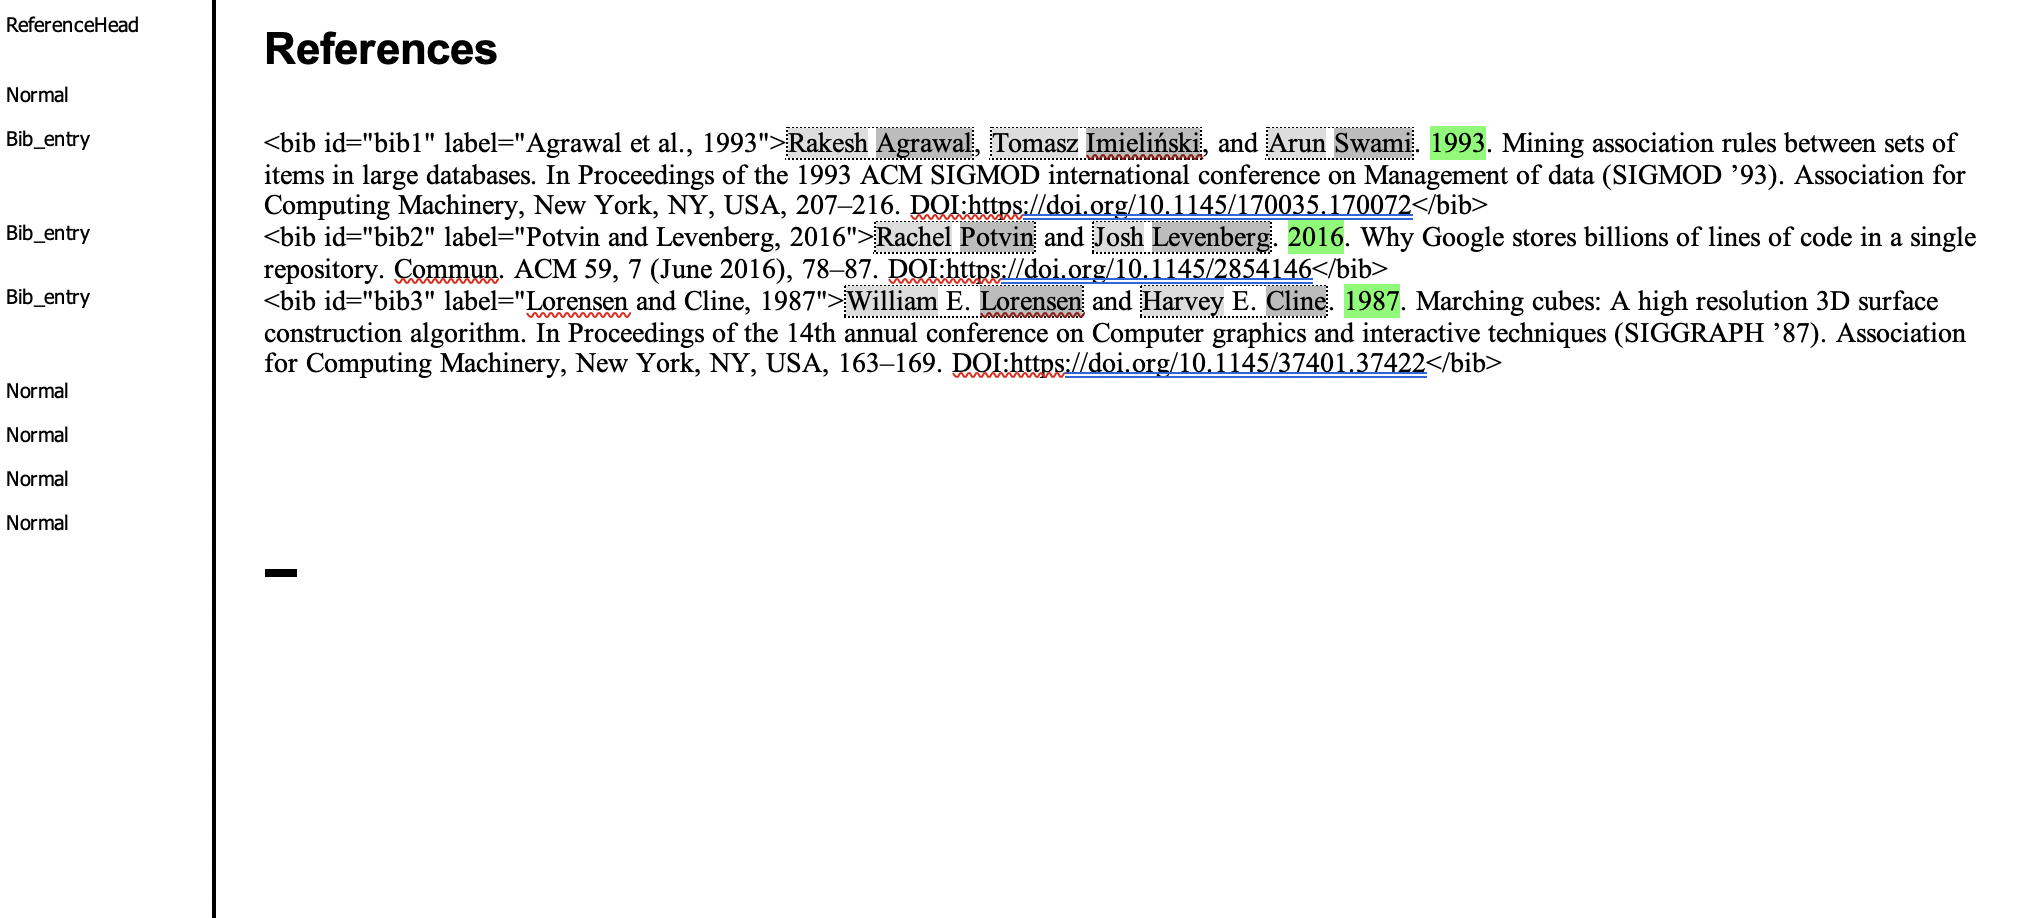
A label has been generated for each reference. For each reference, make a copy of the label and paste it into the placeholder citation to THAT reference. The citation text must match the reference label, or the cross-linking operation will fail. To use the reference, above, as an example: any citation to that reference must look like this: [Levoy, 2008].
When all of the citations in your work have been updated with the proper reference labels, select the "Cross-referencing --> Float and Bibliography" menu item again. After a little more processing of your document by the "Float and Bibliography" macro, you should see a message that says that processing was successful. The citations in your document are now links (and are colored blue), and should have "hover text."
After successfully linking your citations and references, you must select "Manuscript Validation" from the "ACM Templates" menu and run a separate macro that checks the Word document for issues.
EDITING CITATIONS AND REFERENCES: HELPFUL HINTS
When preparing "author year" citations and references, it helps to approximate the citation - adding "[Jackson 2002]" for a reference that should have a citation label that is close to that, then after running the "Cross-referencing --> Float and Bibliography" macro the first time (and selecting "2" for "author year" citations and references), copy and paste the real citation label - maybe it's really "[Jackson and Browne, 2002]" - into the citation's location, replacing "[Jackson 2002]", and running that macro again. You may need to do this numerous times, to resolve all of the issues. The goal is to have this macro run successfully and have all of your paper's citations appearing as hyperlinks.
Changing from numbered citations and references to "author year" citations and references is a multi-step process: first, approximate the citation labels, then remove the generated HTML at the start and finish of each reference, then follow the steps, above, for tagging the authors' names and years of each reference, and then run the "Cross-referencing --> Float and Bibliography" macro, and resolve any issues with mismatched citation labels.
Changing from "author year" citations and references to numbered citations and references is also a multi-step process, though easier: first, replace the citation with the appropriate reference number - is it the first reference? the 20th? - then remove the generated HTML at the start and finish of each reference, and run the "Cross-referencing --> Float and Bibliography" macro, selecting "1" for numbered citations and references. Once a reference is tagged, it is easy to remove the tags and apply them again. For example, if the selection of an author's first name accidentally included the space between first name and surname - "Jackson " - the tags can be removed by selecting the text that is tagged, and then pressing the "control" (or "ctrl") and spacebar, and then selecting and tagging the fields again.